Now you can create your own pear display materials with Pear Bureau Northwest’s customizable 7 x 11 cards. Whether you want to educate your shoppers about a pear’s flavor profile, recipe usage, nutritional value, or price, we make it easy!
Eye-Catching Graphics
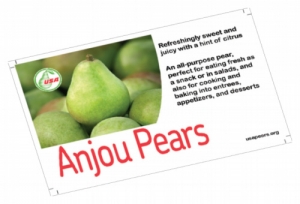
With gorgeous, fresh-from-the-harvest photography of ten varieties of pears and other eye-catching graphics, these 7 x 11 cards can be custom tailored to fit your unique needs.
Point of Sale Materials How and When YOU Want Them
You design them to your specifications, and then you print them when you need them. You can even print these 7 x 11 cards with your color printer and white 8.5 x 11 cardstock paper. We recommend cardstock or photo paper, by makers such as Epson, Hammermill, HP, or Wausau, which can easily be found via your preferred office supply company.
How it Works
We have provided you with a print-ready file in Adobe PhotoshopTM format, so you (or your graphic designer) simply open the file using PhotoshopTM, and customize what you want to print. For a good starting point, see page 2 for samples, instructions, and fun tips!
 Directions
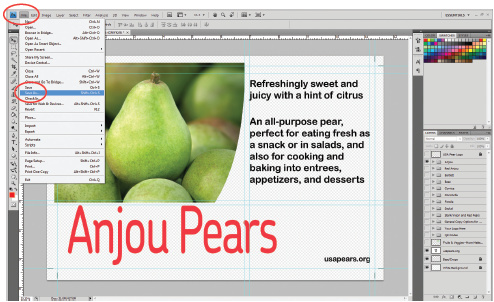
1. Open the file called “USA Pears Point of Sale for Pear Varieties “.psd” with Adobe PhotoshopTM. (Visit adobe.com if you need to purchase this software.)
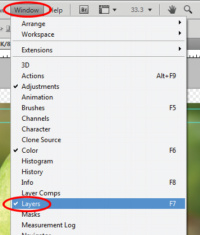
2. Under the “Window” menu, confirm that the toolbox marked “Layers” is checked. This will ensure that you can view and edit the layers found in this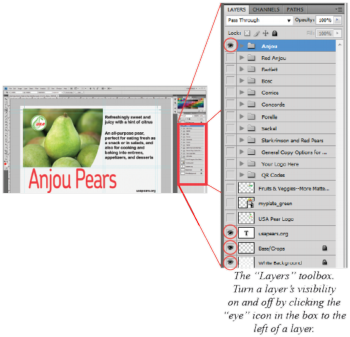 file, which is how you can customize your 7 x 11 card.
3. Note that the Layers toolbox shows a list of pear varieties in alphabetical order. There is a customizable 7 x 11 card design for each of the primary varieties of USA Pears!
4. To view a variety’s basic design, simply click the layer visibility box to the left of the list of layers. An “eye” icon will appear in the layer visibility box if the layer is visible, and the layer’s design will appear on screen. If the layer is not visible, the “eye” icon does not appear.
Note: Layers are ordered from top to bottom. If more than one layer is marked as being visible, then the layers below the topmost layers on the list will show as being underneath the layer (or layers) above it. This means that sometimes layers beneath other layers are partially or even completely obstructed from view by the layers above. If a layer is showing as being visible, but you cannot see it onscreen, then be sure to uncheck the layer visibility of the layers above it.
5. Now it’s time to customize! Click the gray arrow shown directly to the left of the layer’s title. This will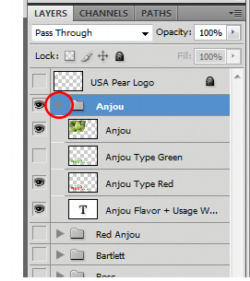 allow all the elements of that layer to appear. Within these elements, you can see more visibility icons that allow you to turn on and off the elements for viewing. Here, you can choose green or red titles for your 7 x 11 card, and you can turn on and off the flavor and usage profiles of that variety. After you open the file, confirm that the “Layers” toolbox is checked. The “Layers” toolbox. Turn a layer’s visibility on and off by clicking the “eye” icon in the box to the left of a layer. Click the gray arrow and customize your image by turning the visibility of layers on and off until the main image onscreen is
designed to your liking.

6. The customization doesn’t stop there! While each variety has its own special flavor and usage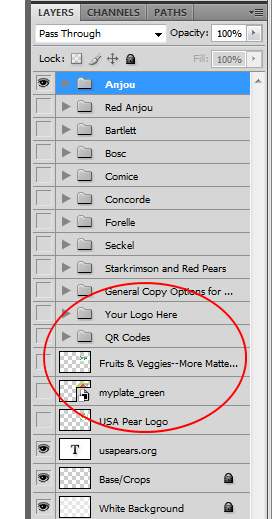
wording, there is a lot more you can do in the white area to the right of the beautiful pear photo. At the bottom of your list of layers, you will find that there are some other features you can ad, including alternative wording to describe pears, nutrition facts, price, QR codes for your shoppers with mobile devices to scan, and more! Have fun exploring all these features, and determine what’s best for your pear displays.
7. This PhotoshopTM file provides dozens of options for customizing your 7 x 11 cards for several different varieties of pears. You can also add your own logo or write your own descriptive copy.
To Save and Print Your Customized 7 x 11 Card
1. Once you have a 7 x 11 card design on your screen that you are ready to save and print, click “Save As” under the “File” menu.
 Note: Save the file as a TIF file if you are printing your cards at a professional print shop. If you are printing your cards in your office with a color printer, then it is best to save the file as a PDF file. If you would like to save the file for usage on the web or in an e-mail, then a JPEG is your best option.
 2. The Adobe PhotoshopTM file that Pear Bureau Northwest has provided can be used as a template to create, save, and print as many different designs as you wish. For each individual 7 x 11 card you would like to produce, you must save and print that file individually.
The finished product is now ready to print and display!
SAMPLE DESIGNS
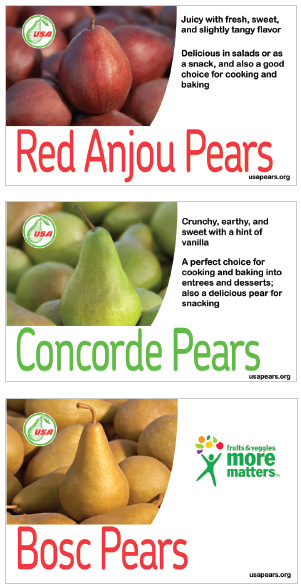
To make this design, under the Red Anjou Layer, turn ON layer visibility for:
• Red Anjou (the image)
• Red Anjou Type Red
• Red Anjou Flavor & Usage Wording
To make this design, under the Concorde Layer, turn ON layer visibility for:
• Concorde (the image)
• Concorde Type Green
• Concorde Flavor & Usage Wording
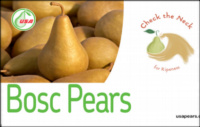
To make this design, under the Bosc Layer, turn ON layer visibility for:
• Bosc (the image)
• Bosc Type Red
Turn OFF layer visibility for:
• Bosc Flavor & Usage Wording
• Also turn ON layer visibility for the Fruits & Veggies–More Matters Logo
near the bottom of the list of layers

NOTE: The content in these marketing communications has been reviewed and approved by USDA following the laws, rules, and regulations enforced by the Food and Drug Administration and the Federal Trade Commission. Any revisions are the responsibility of the editor; Pear Bureau Northwest/USA Pears will no longer be responsible for the accuracy, quality, safety, or nature of revised marketing communications.
Download the .PDF for this page – Instructions for Customizable POS Materials
Download the PS file – Customizable POS Materials
Questions? Contact your Pear Bureau Northwest Regional Marketing Manager, or call 503-652-9720